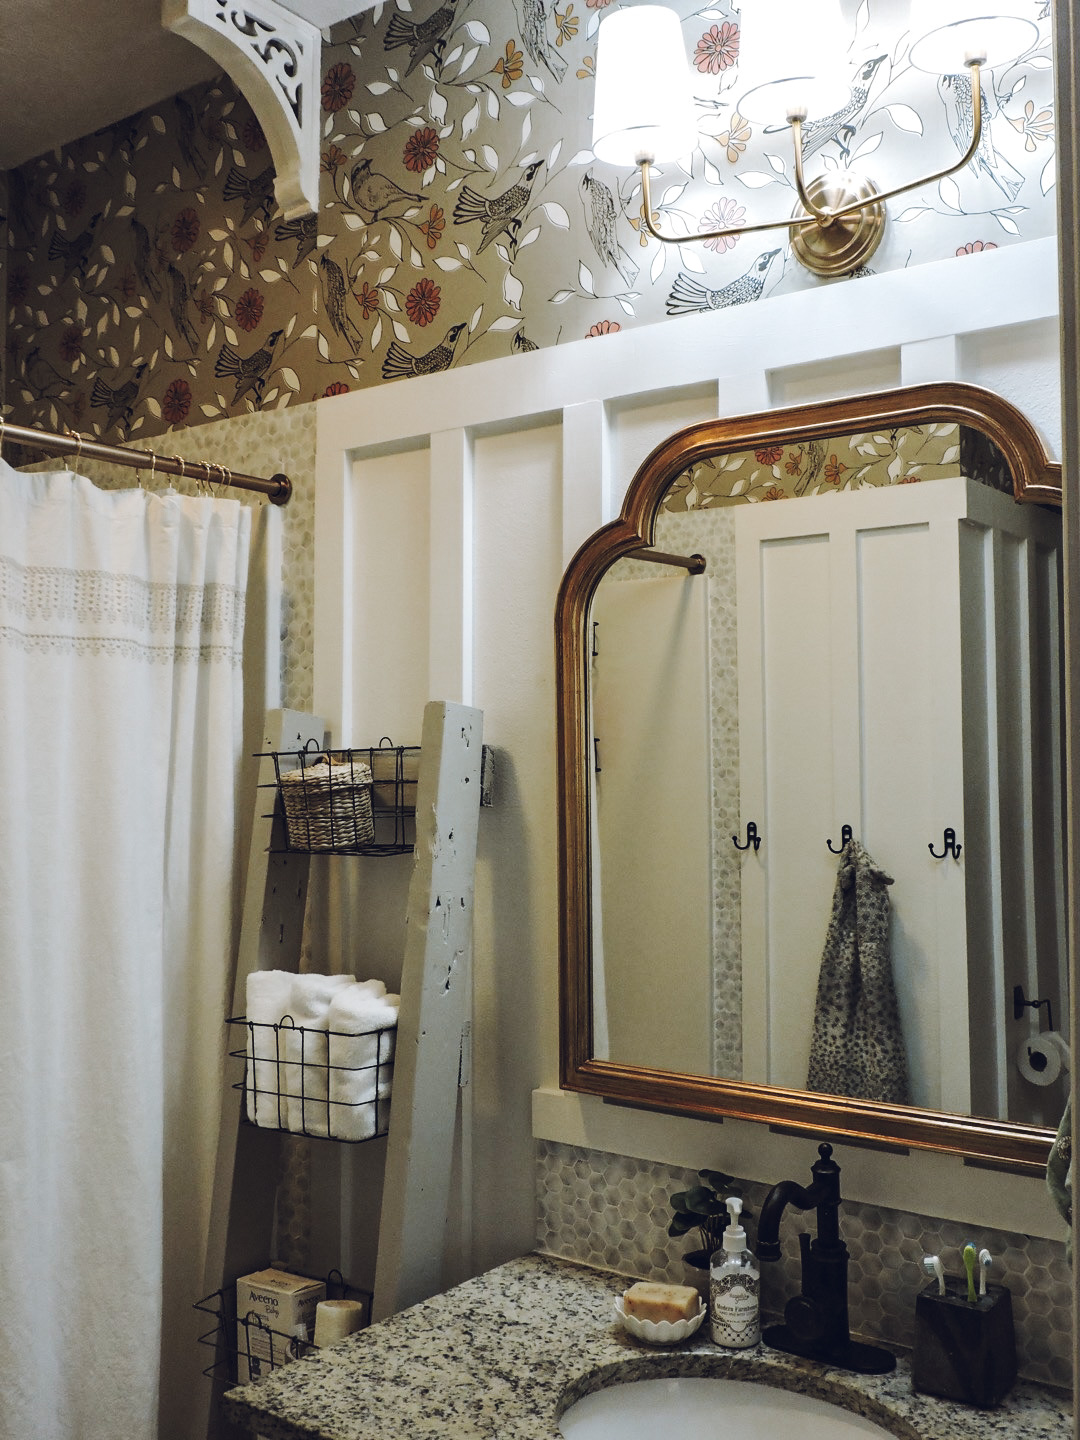
Showing: 121 - 130 of 133 RESULTS

Creating A Cozy Fall Home

Hi! Are you as excited for fall as I am?! This is truly one of my favorite times of the year. As temperatures slowly drop, school starts and a new season is upon us, I find myself reflecting on the summer and at the same time, anticipating the months ahead. Fall is one of those magical seasons that is packed full of joy filled moments and experiences. Football games, cooler weather, sweatshirts and big comfy sweaters, porch sitting and rocking, pumpkin patches and picking pumpkins, the start of school which is always exciting, soups, breads, baking, the smells, the sounds. I could really go on and on. To me fall is all about cozy vibes and I want to share how I create a cozy fall home.

Besides your typical pumpkins and Hobby Lobby decor you put out; there are other ways to add coziness to your home for the cooler months. One of those ways is pillows. Lots of pillows! I like buying pillow covers so I can swap out my pillows easily for the different seasons. For fall I like adding knit pillows to add texture. You can purchase this knit pillow cover here.

This year I added these rust orange colored pillows that add a nice pop of color. I purchased these two smaller rustic fall pillows from the local pumpkin patch we visit every year.

Notice the texture on the rust colored pillows. Also, you can’t go wrong with plaid during the cooler months.

Throwing a pillow in a basket with a few other fall items is another way I like to add cozy vibes. I sell these fabric pumpkins over on my Berry Berry Quite Contrary facebook page.

Another way I like to decorate for fall is by adding lots of throw blankets around our home. Draping one on a bench or in a basket with a few pillows is a great way to display your blankets. Other obvious places are on a couch, chair or bed.

Adding strands of lights is another way I bring in coziness into our home. I strung these lights with this garland on our fireplace.

In the last year I’ve added quite a few plants into our home. I like throwing a string of lights over them. These lights came in a pack of 4 and are all on a timer. You can purchase them here.

I strung some across this chalkboard in our dining room as well. I love these battery operated lights  because it’s easy to hide the cords!

I’m becoming a pretty big faux candle lover as well. I love the look of candles but running around my house lighting a bunch everyday and also trying to remember to blow them out is not something I want to have to worry about. These faux candles  are my favorite right now. They flicker so give the appearance of being real. I appreciate the fact they have a remote and a timer with them as well. They automatically come on in the evening and turn off on their own. Candles always give cozy vibes so I have these spread throughout my home as well.

One of my favorite ways to add a touch of fall in our home is through scent! I love all the smells of fall. I recently became a Young Living member and am just a little obsessed. Ok, maybe a lot obsessed right now. I really appreciate the fact that diffusing my oils creates yummy smells and also health benefits.

The last few days I’ve diffused these three oils together and it’s giving me all the fall vibes. I ordered some more oils; orange, cinnamon bark and nutmeg to name a few. I can’t wait to try out those oils as well during the fall season.

To get your own oils you can go HERE to purchase.

Another way to add in fall vibes is through nature itself. I bought this wheat grass from Hobby Lobby. I like the natural texture it adds to this space.

I also like adding it in baskets with blankets and pillows.

I can’t get my hands on any large pumpkins yet but a friend brought me a couple of these small ones.

I can’t wait to buy all the mums and pumpkins here in a few weeks.

Hope this gave you a few ideas for your own home! Thanks so much for stopping by!

Kayla

Laundry Room Makeover-Take Two

Well, here I am again. Almost two months ago I showed you all my laundry room makeover. To be honest… I didn’t love it. It didn’t really feel like me but I took the pics and posted them anyways. Over the last year I have felt this pressure to “keep up”. Instagram and the blogging world are super fast paced. I follow home decor accounts who completely re-do a room in like a week. And it seems they are always doing something new or purchasing this thing or that. I have looked around at my own home with a downcast face. The culprit? Comparison. Not being content. Social media can be great and wonderful, but also really hard sometimes.

God has been working on my heart in this area of my life for a while now. Shortly after I posted my laundry room makeover I had a “light-bulb” moment, if you will. No longer am I going to be decorating for likes, more followers, or to simply feel like I’m “keeping up”. I am going to decorate for the simple fact that I LOVE to decorate my home. Being creative brings me joy. If I’m not being creative, I find that my joy levels go way down. Being creative is part of who I am. Whether it’s writing on here about my experiences, painting a room, re-arranging a book shelf, journaling, or making over a whole room….. I NEED to be creative in some shape or form. Creating a warm, cozy, inviting home for my family is my end all goal. Will I move at a slower pace than most? Probably. But part of the fun of decorating is the planning and envisioning and dreaming. Kind of like Christmas morning. The anticipation is half the fun!

I’m super pumped to show you guys my “laundry room makeover (take two)”. I went with my gut, purchased items that pulled at my heart strings and put up some wallpaper that was in my mind, a risk.

This time around I really DO love how it turned out. If you want to see what it looked like before, go here.

Grab some coffee, get cozy and come take a look!

2E53708C-5AA7-47B2-896F-9C66AFA02AF5

The first time I made over this room, I put frames up here that I was going to put pictures of my girls in. I quickly realized I missed wallpaper in this space and the frames didn’t really work for multiple reasons. I love the mountains and this wallpaper reminded me of them. This was a risk to me, but a risk that paid off in my opinion! Stick and peel wallpaper is pretty easy to work with and it took me less than an hour to get this up.

03CFBDAC-E0D9-431E-ABC1-DFD2A19A7AB3

These hooks all hold the girl’s backpacks and coats during the school year.

D2247F82-0CAA-457F-8EEE-5CBD3B2E9C86

I am slowly starting to put some fall decor out. I put one of my fabric pumpkins that I made in this macrame hanger. I think it’s so cute!

F9F70DE7-A85E-4570-B8CA-DAD995316A60

This accordion hook piece was a garage sale find I scored for $1. I painted it white and distressed it. I also spray painted our light switch cover a champagne gold.

5B1DA436-AE67-4B10-B92B-AEC7195A16D4

I found this copper, bird bell at Sister Golden. They have such unique stuff, I love their site!

E40D4DF8-1428-424F-9FCE-C1C17899FE72

46F96C6A-1599-4BE4-AB7E-43A27E1B40E3

I switched up some things on our diy counter we made for this area. I need a lot of the counter space to fold clothes on.

0C32810E-50B8-4A5B-9650-86010B84AFE9

Here is another touch of fall with some of my fabric pumpkins.

CCD226D5-B60F-4E60-B62D-6947C6E9DCA5

C2C9D46A-27FB-4723-B83E-26EBAA001B47

Cords that are visible really bug me so I used this long basket and placed a pillow in it to hide all of the cords behind it.

2C9B7E1A-B3F4-496E-9B2E-00A103F0779C

The art I had up on this wall the first time around I was not a fan of at all. This is more me. I found this little shelf for $1 at a garage sale and used some .50 c paint I got from Home Depot in the messed up paint section to give it a little makeover. It now holds all of my Young Living Oils (which I am now obsessed with by the way).

01F139C2-C850-4403-8053-079263380E03

I’m sure I’ll need another shelf in the future. 🙂

600FA94E-41EC-4E15-8622-FE26633E49A6

This picture of my girls makes me smile. We’re getting family pictures done this fall again, I’m really bad at scheduling pictures; hence why Emmy isn’t in any.

6B7173C1-F53C-4FD8-AB74-A0ABD26EE013

This woven shade is from Walmart. Before, I had no window treatment in here and it is amazing how much better it looks with the roman shade. I really like how it’s cordless.

139C1BB0-1514-4519-B369-57E27E67D705

F5180493-59BF-404E-9011-2EC8F2BE3057

I was trying to put into words my style and I seriously don’t even know how to do it! I like rustic, farmhouse, cottage, a little modern, a little boho…. seriously…. any type of decor out there, I probably like since I love design so much.

595639D6-F577-4CDC-B0C9-151E59F34019

My snake plant really likes it in here. If you are new to plants and want to start, a snake plant is very hard to kill.

E716855B-C3B8-4D9A-AE62-B2C7D26F5E66

299ECB57-2FEA-473F-8BA0-F3BF6501ED59

903B3D81-56E7-48D3-9566-AA4A471E5C71

7718BEC8-212F-48DA-9B5F-8A72EB7D40CF

Another little touch of fall.

4325BFFB-89D3-408A-AD17-B33F13BA82E9

2319D685-031E-4A14-B7C5-50F06A97EEBA

2E53708C-5AA7-47B2-896F-9C66AFA02AF5

I still will be adding a few touches of fall in this space. September 1st is my big fall decorating day. I can’t wait!

I’m so happy that I shrugged off all the stipulations and deadlines I was placing on myself when it came to decorating my home. This little space makes me happy and I hope you gathered some inspiration. Thanks so much for stopping by!

Kayla

Fall Porch 2019

Hi friends! Today I want to do something a little odd; I want to share my fall porch from last year. Last year I got lots of pics because of my Instagram account but wasn’t blogging at that time so I thought I would blog it all for you now!

I can’t wait to start decorating this year! 2020 has been such a weird year and I’m looking forward to fall and all the beautiful, wonderful things that come along with it. I’m really hoping football is on tv. Mostly for the snacks and how it brings people together. Also, for me, having a football game on tv is extremely comforting to me. I don’t know why but I just love the sound of a game on. Nostalgia I guess.

Come take a look at our porch last year all decked out for fall.

356D8470-AFD2-418E-A052-993D4573ADDC

Our porch looks completely different now. To see what I did click HERE.

E0DD24CF-EF49-468B-B1F9-5E1213795B7C

EF74F0E5-34C1-4AA9-814E-E34767FB5341

I made these faux apple candles. Apples are faux, candles are not. 😉

8A765833-C1FE-409D-B691-39B0B7B9F1DE

9786BBA9-7609-45D3-A382-B8582FC7FC94

5D320068-9260-42E4-9745-5DDE7EB143CD

In the summer we don’t spend a ton of time on our porch because our house faces west and it gets SO hot. But in the fall, we love to spend as much time out here as we possibly can.

64E05831-846A-4A6B-BD52-F4E07AD8AD2D

I’ll show you a few shots of inside of our home as well.

5A15E94E-C565-40CE-A4A0-76D3DFE04B48

230AE315-744F-43BD-A4A6-9FA8F1E43F88

5BE3F232-9BA5-46CA-8F42-18318F3A95F5

CC4807DD-0C8B-433F-BF0E-90685FB4D8F4

F6A5BFDE-A2FC-41D2-809D-FC5C5E7C8366

I am already planning out my fall decor for this year. I’m leaning towards warmer colors like camels, oranges, greens, and of course I have to throw white in there as well. My porch will look completely different this year and I am excited to show you all in the near future. I have a project I want to complete this week that involves the porch. It will make it even more fun to decorate it for the different seasons.

September 1st it’s game on over here!

Thanks for stopping by!

Stenciled Sidewalk Curb Appeal

The last few months Matt and I have been working on the curb appeal of the front of our home. I painted our porch and gave it a mini spring makeover. New rugs and some plants made a big impact. Never underestimate small details; they can make a big difference. And this last weekend I stenciled a pattern onto our sidewalk of the front of our home. I LOVE how the stenciled sidewalk turned out!!! I was honestly a little nervous to do it. I’ve never stenciled anything before and you don’t see too many stenciled sidewalks around. But I decided to just go for it and hope for the best…. kind of been my mantra lately!

Isn’t it so cool?!?! I’ve always loved the look of stamped concrete but that was not in our budget. This cost us $20 for the stencil, I already had the primer and paint on hand leftover from our porch makeover. I purchased this star tile stencil  from royaldesignstudio.com to create this pattern. Shipping was SO fast! I was super excited to receive it earlier than expected.

First step was priming our sidewalk. I used the BEHR Concrete & Masonry Bonding Primer. I used a paintbrush to apply it and let it dry over night.

I used the BEHR Porch & Patio Floor paint . 

I started out by using a roller when doing the stencil because that’s what I’ve seen others do on Instagram; but after doing a couple I quickly reached for a stenciling brush that I picked up for a couple dollars at Hobby Lobby. I preferred the brush WAY more than the roller. I felt like I had better control and didn’t get any runs with it like I did with the roller.

The black design ties into our black striped porch steps and other decor on the porch.

I only had four more spots to go when I accidentally put my stencil on wrong. Nothing can ever go perfect, right?! That would be way too easy. Luckily I had some paint thinner on hand and a wire bristle brush. I let the paint thinner soak for a minute or two on the paint and used the brush to scrape it off. Worked like a charm. Crisis averted.

I know next Spring I will have to more than likely touch some of this up but I’m fine with that. The snow in the winter can cause some of the paint to peel off; especially if it’s sitting there for an extended period of time.

Thanks so much for stopping by!

Landscaping Front Yard and New Trees

The exterior of our home has always been just as important to us as the interior of our home. When we pull up to our home we desire it to look warm, inviting and cozy. Moving into a house with ZERO landscaping was definitely overwhelming. A blank slate is awesome in some regards but not in others. Number one, Matt and I are no professionals. We have learned all about landscaping through trial and error. Number two, landscaping is expensive. I would’ve loved to move into a house where there was already grass and trees and plants but that was not the case here. Adding all of those things has been pricey and wasn’t something we could do all at once. There are also positives though. A blank slate lets you do whatever you want. As a creative person, it’s been very fun thinking and planning for new ideas for our yard. We’ve been able to choose everything. That part has been awesome.

We believe landscaping can add so much to a home. Nature is beautiful. God’s gift to us. And we wanted to add some more nature to our front yard so we planted some trees!

Matt recruited Jayde to help plant trees. Jayde loves doing any kind of activity like this!

The other girls wanted to help too. Notice Brielle’s snow shovel. 🙂

We’ve known for a while we wanted to add some more trees in our front yard. We did A LOT of research on trees. SO many to choose from. Eventually our walks around our neighborhood lead us to decide on the Quaking Aspen Tree. A couple houses around us have these trees in their yard and we loved them. After doing some research on them we decided they were the tree for us!

Since I was a little girl my mom and dad have taken us to Estes Park, Colorado for vacation many summers over the years. All my girls have now experienced it and have fallen in love with the mountains as well. It has grown to be one of my favorite spots in the whole world. These trees remind me a little bit of Estes Park. An added bonus.

These trees have beautiful yellow leaves in the Fall (can’t wait to see them change color) and are known for their “quaking” leaves. The leaves rustling is a very peaceful sound.

The trees will grow more so up, not out. They will give us a little more privacy on our porch but we will still have our view of the Kansas sunsets.

I have one more diy project planned for the exterior of our home. The trees were supposed to be the last thing but I had the idea last night while going to bed and now have to make it happen! Don’t worry Matt. If you’re reading this, it wont involve your help!

When it comes to landscaping Matt and I make a pretty good team. He is really good at landscaping and I’m good at placing things where they need to be. Team work makes the dream work. 🙂 (Sorry, had to.) 🙂

Hopefully this will inspire you to plant a tree or two or just simply enjoy the nature surrounding you.

Thanks for stopping by!

Spring Front Porch Reveal

I am so excited to share with you all our Spring front porch reveal! Get ready for lots of pictures! I’ve been patiently waiting for warmer weather to arrive so I could go out and buy plants for our porch. This weekend was beautiful here and I think the higher temps are finally here to stay! Hopefully. Fingers crossed. You really never know with Kansas weather.

A blank slate.

After! Isn’t Spring an exciting time?! I always get excited to plan and decorate our porch with plants and accessories. This year is my most favorite I’ve ever done.

Last weekend I touched up our shutters and siding with paint. You can see on our siding here that the new paint sticks out. Eventually, as it gets dirty, it will blend in with the old paint. Just thought I’d explain in case you’re wondering what those dark spots are all over our siding!

I wanted to incorporate some pink into our front porch and did that by adding this awesome pink rug. You can see there is some navy in the rug too which helps it tie into our navy siding. It is screen printed and thin so works great here. I found it at Rugs USA for a great price and you can purchase it HERE.

Matt bought me these tall planters for Mother’s Day a year or two ago. Well I bought them and told him this was going to be my gift from him. 🙂 They are really heavy and really good quality. I bought them at a pop up greenhouse here in our town.

This macrame hanger was a Target find. I bought it on sale for $10. You can purchase it HERE. I just stuck a little succulent in it in the same plastic planter it came in.

Since the planters are so tall, I wanted a plant that was pretty tall as well so it would look proportionate. I was SO happy to find these plants at my local Home Depot.

This jute rug was an Amazon find. I knew it was the perfect one right away for my space! I was so happy I came across it! I haven’t found it to shed at all and it seems to be made very well. It’s a thicker rug. Unfortunately the price has gone up almost $15 since I’ve purchased it. Boo. You can find it HERE.

Somebody wanted to help mom water.

I found this watering can in the Dollar Spot at Target.This was back at the beginning of the year. I really like the gold handle on it.

This faux copper light fixture was a diy and is not hardwired in. 

We are still LOVING our newly painted cement porch steps and floor.

Sweet Emmy.

Thanks so much for stopping by!

Favorite Copper Spray Paint

937B3E05-2015-4358-BAA6-5B1BEE156018

Hi guys! Today I want to talk about my favorite copper spray paint. Spray paint is the quickest, easiest way to change up an item. The trick with spray paint is to do very light coats and to always keep your can moving. Stay in one place too long and you’ll get too heavy of a coat and get drips. No one likes drips. And if you put too heavy of a coat on it wont dry properly. I’ve learned all of these tips the hard way!

I’ve always wanted a light fixture here on this side of our front door. I found a copper light fixture I loved but didn’t want to spend money on it at this time or pay to have a light hardwired in.

A21AB4AD-72AE-43DB-8266-F546242304BE

I remembered I had this old light fixture that I wasn’t using and decided to spray paint it!

F51EF7E9-03AD-424A-8EB0-7EC529368CC9

After:

271D4CB5-93EC-42AD-AB42-4E3B476D3A53

After lots of research I decided to go with this Rust-Oleum Bright Coat Metallic Finish Copper Spray paint. You can purchase it HERE.

4E291D4B-BB24-47D5-8D24-A20930F3BBB6

To install the light I just drilled two pilot holes and then screwed the light fixture in. Easy peasy.

40FB1323-10B0-45A9-8927-93A39F5C0911

I glued a battery operated puck light into the light. The puck light I own has a remote control and timer to it. So I can set my light to come on in the evening and it will automatically turn off. You can purchase a puck light HERE. I first learned of this trick from Nesting With Grace. It’s brilliant! Someday we will actually have a light hardwired in but for now, this works!

DB262EED-DBA7-4CAF-BDA3-CE9AE297DEA8

This envelope mail box  is from Pottery Barn.

737BF65C-FCB9-4505-82DB-84B89714B19E

So excited we have a cute light out here now! I have lots more ideas for this space! Can’t wait to bring some greenery onto our porch…. it has been hard for me to hold out but I know mid-west weather can be crazy and it could possibly snow next week. Or the week after that. And so on. 🙂 So I will wait a few more weeks.

Thanks so much for stopping by!

Pine Boards Ceiling Treatment

Hi friends! A few weeks ago, when the coronavirus started getting more serious, we decided to grab a few items for projects that we’ve put on the back burner for a while just in case we were both stuck at home for a period of time. Fortunately at this point in time I am the only one at home and we are able to keep our small business open. But since we had everything on hand for a project I’ve been wanting to do for a while, we decided to do it this last week! Doing this project actually helped both Matt and I take our minds off of life for some of Sunday. Owning a small business has been hard and stressful during the last month or so. On top of that, homeschooling, new schedules, etc. has kind of taken a toll on us. So this was the perfect time to clear our minds and focus on this project!

We put up pine boards in the trey ceiling! It warms up the space so much! And adds a ton of character.

This is something we’ve been wanting to do for a long time now. I think half the battle is just getting all the supplies you need for a project.

I had a color of wood in my mind but couldn’t find any stain to match it. I ended up mixing 3 different colors to get this stain color. It turned out exactly how I pictured it in my mind! I ended up using a combination of Varathane Early American Classic Wood Interior Stain,  Varathane Provincial Classic Wood Interior Stain,  & Varathane Dark Walnut Classic Interior Wood Stain.

We used a quarter in-between each board so we’d have the same spacing throughout and used a nail gun to attach the pine boards to our runners going across our ceiling.

Matt did all the measuring and mathematics for this project. We were a tiny bit nervous that we wouldn’t get 12 even boards into the space but Matt’s mathematics proved correct! Never doubted him. 😉

This project was under $100.

Isn’t it amazing how wood totally warms up a space?

Thanks so much for stopping by!